A Newbie's Guide to: Melt and Pour Soap Making
As many of the Happy Barnet Craft Challenges include trying new crafts or new techniques, we thought we'd share some tips and useful info for beginners about our favourite crafts to help you get started.
Today it’s our beginners guide to melt and pour soap making!
What's so great about it?
This method of soap making is really simple but at the same time it allows you to be creative through the ingredients you choose to use, the shapes you select and the embellishments you can incorporate. If you are trying to reduce your use of plastic and/or take more control on the substances you use in your grooming products then again this can help with that. It’s something that’s practical but can make a really lovely gift too and there’s not too much needed to get you started which is always great!

What you'll need
There are a few pieces of equipment you need to have but mostly it’s about the ingredients you use and it’s up to you how much you buy of these at the start. Below I’ve listed the main types of ingredients you can choose from but you don’t need to go wild and get everything all at once. I’ll include links to recipes below to get you started and then you can go from there.
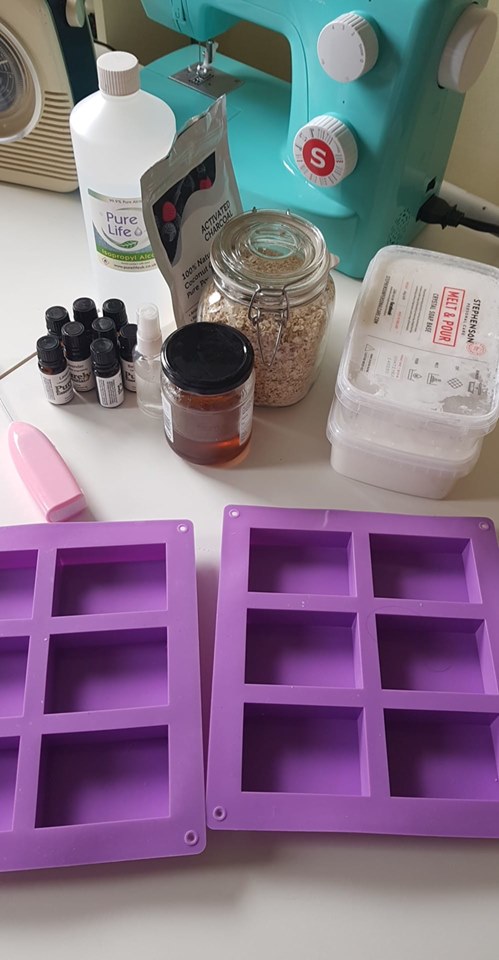
Materials
Soap Moulds - There’s a huge variety available online in stores such as The Soap Kitchen. You could choose to go for a wooden mould with cutter or if you prefer, choose one of the many silicon shaped moulds which can even include writing on your soap. For me, I started with a couple of simple silicon tray moulds like this one. (just spotted this honeycomb shaped mould ...oh my goodness, I may need to get it for my honey soaps!). I’ve also used silicon baking moulds I already had lying around my house - see the photo of the star shaped soaps!
Heat proof jug - I have a couple of the standard glass measuring jugs which I use to melt the soap in the microwave and pour into the moulds.
Soap cutter (or kitchen knife) - I don’t own a soap cutter and just use a large kitchen knife but it’s something I’m thinking of getting just to make things a bit easier now I make soap fairly regularly. It’s not essential though.
Something to stir your soap base - You’ll be doing this a fair bit during the melting process and I find that something metal works well (I actually use my cooking thermometer) but you can buy specific silicon tools for this too. Basically you don’t want something that’s going to collect a lot of the soap on it.
Isopropyl Alcohol (recommended)- This helps get rid of bubbles on the surface of your soap. You’ll need it in a spray bottle. It doesn’t cost much so if you are planning on making lots you might want to get a slighty bigger bottle as I used my first tiny one up pretty quickly. Also used for dispersing ingredients like charcoal.
Microwave (optional) - you can melt it without a microwave but this is quicker….just keep an eye on it and make sure you follow the rule in all recipes that you melt it in 30 second bursts.
Milk Frother (optional) - this might sound like an odd piece of equipment to get but if you want to make soap with activated charcoal (one of my favourites!) a milk frother is a really useful tool to disperse the charcoal before adding to soap mix and avoid getting black marks on the surface of your soap. You can pick them up online for about a £1.
Embeds and Embellishments (optional) - These are little goodies you can add inside your soaps or decoration on top, from little toys to pieces of lavender.
Soap Stamps (optional) - a bit like cookie stamps, these will make an impression in your soap and leave an image or words behind.
Ingredients (Don’t worry about the long list! Other than the soap base itself everything else is optional as it depends on what you want to include)
Melt and Pour Soap Base - Unsurprisingly you definitely need some of this! There are different types you can buy from goat’s milk, jelly soap, aloe vera, transparent and apparently even donkey milk!! Some do still have SLS (Sodium Laurel Sulphate) in them and I know a lot of people are looking to avoid them, but just read the ingredients to choose one that works for you. I’d recommend looking at Stephenson’s Melt and Pour Soap Base range to get some ideas, they include all ingredients so if you want to avoid SLS or want to pick vegetable based soaps you can check it all out before purchasing.
Essential Oils - there are so many combinations you can use, it’s really up to you (or your recipe!). If you are new to using essential oils I would definitely recommend following a recipe to make sure you don’t add too much to the mix as some essential oils can be quite irritating or even damaging to the skin if you aren’t careful. My favourites are lavendar and bergamot but I’ll include a link to a few recipes below to help get you started.
Botanicals and exfoliants - Perfect for adding a touch of natural decoration to your soap, botanicals such as lavender, dried orange slices and rose buds can either be bought or made/collected by you depending on what you have availability. Exfoliants such as crushed almond shell or oat powder can be added to your soap to provide general exfoliation.
Butters and oils - Just browsing through lists of butters and oils for soap making sounds utterly relaxing! Primrose oil, avocado oil, shea butter, coconut oil, mango butter mmmmmm! So far I’ve not used these myself although I have added honey to a couple of batches!
Colours - there are a few different ways to colour your soap if you want to do that. It may depend on the base soap you choose and the effect you want to create from using pigment or water based cosmetic colours to adding glitters and micas to your soap. (Micas are like glitter but are more pearlescent). (Top tip: don’t add too much as you might end up covered in it when you wash! Also, where possible please use biodegradable ingredients)
Clays and powders - Clays help soften the skin and so are a great thing to add to your soaps and some will be a great way to add natural colourants to your soap such as green clay or rose clay.
Activated Charcoal - my favourite! Is any list complete without a recommendation for Activated Charcoal these days? It has lots of great benefits including fighting acne, clearing pores and balancing oily skin plus it also turns your soap a gorgeous grey or black which can be quite stunning!
How to get started
So yes, that’s a long list of ingredients but honestly you won’t need even half of them to get started. The best thing to do is pick a recipe you want to try and buy only the ingredients for that. Or if you already have essential oils or other ingredients from the list in your house, look for a recipe which uses those and then all you’ll need is the soap base.
When you have everything you need, I’d recommend making sure you have everything laid out and ready. Measure out what you can before you start melting the soap. Once the soap base is melted you will want to work pretty quickly to avoid it getting a skin on top or harden so that it pours well. You will also need something heat resistant to stand your melted soap base on whilst you add in your other ingredients. I just use a large wooden chopping board. Read through your recipe (or watch your instructional video) fully before starting so you can see what needs to be done, again this will help you prep everything in advance and know what you need to do once you have the soap base melted.
It can take a while to melt so the process can feel slow to start and then quite rushed. It’s quite different to other crafts I tend to do so this through me the first time I tried it. It’s really closer to baking than anything else.
Techniques to learn
Once you have mastered the basics, there are a lot of ways to play around with melt and pour soap making, here’s a few ideas:
Layering and Swirling- This is very simple but can look stunning! Lots of recipes use different colours in layers or swirls or marble effect. Don’t be put off by these, just look at the recipe and you’ll see it’s pretty straight forward. Some with lots of might need the tall type of mould where you then slice up the soap but even then, once you have the right tool it won’t be as tricky as it looks.
Different shapes - the first time I tried a different shape was by accident. I had a silly amount of melted soap base left over so just grabbed some star shaped silicone cupcake moulds and used those. They looked so great I’ve used them ever since!
Different ingredients - It’s easy to keep going with one recipe you like but half the fun is in trying out new things so pick up some botanicals, try a different base, look up different essential oils to try and make something unique!
What I wish I'd known
Pouring isn’t that hard - The first time I made soup I was really nervous about pouring the melted base into the moulds. I’m fairly clumsy and I didn’t want it sticking up the sides like my cupcake mix typically does! But in the end a slow but steady confident pour was pretty easy so just go for it!
Say when - The first soap I made was a layered soap and it was only when I started pouring I realised I would just have to guess where the halfway point was. You can easily over think this (like I did!), just remember it’s homemade soap and they don’t all need to be exactly the same.
Bye-bye Bubbles - l was so surprised the difference when using the Isopropyl Alcohol. Recipes will tell you to spray the top of the melted soap once you have poured it into your moulds and you will see the bubbles disappear. It gives your soap a really smooth finish and looks great. Don’t worry about the smell, it evaporates completely.
Think ahead - You’ll be leaving your filled moulds to set for a while so make sure they are laid out somewhere they can stay or have them on a tray so they are easy to move elsewhere. I made that mistake the first time!
Some inspiration and recipes

I’m sure once you have a go you could start playing around with combinations of ingredients yourself but to help get you start and especially to help you understand the quantities of ingredients such as essential oils, here are few melt and pour soap recipes:
Charcoal Rose Clay Melt and Pour Spa Bar Recipe
Simple Aloe Vera Base Melt and Pour Soap Recipe
Oatmeal and Lavender Melt and Pour Soap Recipe
Bee Pollen Melt and Pour Soap Recipe
And something a little fancy!: -Classic heart melt and pout soap recipe
Want to join in with the Happy Barnet Craft Challenge? Join our Facebook Group and take a look at the Craft Challenges for 2019.


Challenge completed!!!
A gallery of completed craft projects from the Happy Barnet Craft Challenge 2022.